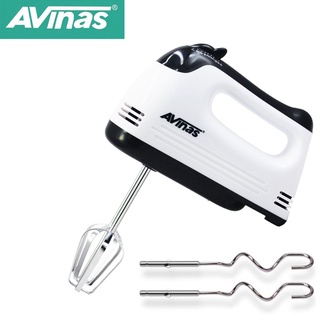
Sell AVinas Av 133 Stainless held mixer best price
4.9
918
ratings
999
sold
₱399
51% OFF
₱195
| Brand | Avinas |
|---|---|
| Ships from | Meycauayan City, Bulacan |
| avinas | av-133-gray av-133-white |
Product Description
CooI touch housing
Power & Ready to cook indicators
Vertical storageCord winder
Non-stick coated cook plates
Voltage: 220V-50Hz
Power: 750W
Plug Type: EU Plug
NOTE:BEFORE USING THE ITEM
IF YOUR NOT FAMILIAR WITH OUR PRODUCT PLS READ THE MANUAL CAREFULLY AND DONT HESITATE TO CONTACT OR MESSAGE US TO OUR SELLER CHAT WE WILL TEACH AND GUIDE U OF HOW TO USE THE ITEM .Thank u And God bless
【Features】
● Clean the baking plates with a damp cloth or sponge.
-Slightly grease the baking plates with a little butter or cooking oil.
-Plug in the sandwich maker and heat up the plates until the GREEN READY TO COOK PILOT LIGHT GOES OFF.
The sandwich maker is ready for use
NOTE: WHEN USING THE SANDWICH MAKER FOR THE FIRST TIME , A FINE SMOKE HAZE MAY RESULT .
THIS IS NORMAL BECAUSE OF THE INITIAL HEATING OF THE INTERNAL COMPONENTS .
making toasted sandwich
● Put the mains plug into the wall socket . The red power light and green power light will both illuminate to show that the sandwich maker is heating.
-Prepare the bread and the filling for your sandwich while sandwich maker is pre-heating.
-Wait until the GREEN ON PILOT LIGHT GETS OFF , THE SANDWICH MAKER IS THEN AT THE CORRECT TEMPERATURE FOR USE .
-To obtain an even golden brown result , YOU CAN SLIGHTLY BUTTER THE SIDE OF THE BREAD IN CONTACT WITH THE PLATE .
-Lay the slices of bread with the buttered side on the lower cooking plate , place your filling and cover with the second slices of bread
with buttered side up . You can toast only one sandwich if you wish. For optimal result, fillings should be placed well within the sandwich
slices.
● Lower the upper cooking plate carefully onto the bread until the sandwich maker is tightly clamped.
-OPEN THE SANDWICH MAKER AFTER 2-3 MINUTES AND CHECK WHETHER THE TOASTED SANDWICH IS SUFFICIENTLY
"BROWN" . THE COOKING TIME REQUIRED TO OBTAIN CRISP BROWN SANDWICHES DEPENDS ON THE TYPE OF BREAD ,
FILLINGS AND YOUR PERSONAL TASTE
-Use non-metallic utensils (e.g Wooden spatula) to remove the toasted sandwich maker.
Do not use sharp or abrasive kitchen utensils.
-Unplug the sandwich maker from the wall socket after use .
●NOTE:DURING COOKING , THE GREEN READY TO COOK PILOT LIGHT CYCLES ON AND OFF TO MAINTAIN THE APPLIANCES AT THE CORRECT TEMPERATURE.


